Asbra Safety Stair Treads & Nosings Installation Guide

Asbra Safety Stair Treads & Nosings Installation Guide

Asbraloy and Asbrabronz Stair Tread Nosings and Inserts

Secure and rigid fixing is essential for safe, satisfactory performance. All movement and rattle must be eliminated. Latham Asbraloy and Asbrabronz Stair Tread Nosings and Inserts are generally supplied factory cut to length complete with countersunk holes screws and plugs, on request the treads can be supplied uncut and undrilled in full 4600mm manufacturing lengths.


Unless otherwise specified with order treads will be cut to size and pre-drilled to suit 8 gauge stainless steel or brass screws. Holes will be located at 250mm centres and will be evenly spaced from either end of the tread (50mm-175mm from either end of the tread depending on the cut length). 

Good Design Asbra Safety Stair Treads.png
Australian-Made-Logo-Colour.jpg
Latham-Genuine-Warranty-Green-Tick-Symbol

  1.  Locate the stair tread in position ensuring it is located centrally on the tread, use the factory pre-drilled holes as a template to mark the location for the holes in the substrate, this is best done with a permanent marker or a fine masonry drill bit (3mm-4mm) (note this step is not required if the substrate is timber, proceed to point 4).
  2. Remove the tread and drill the fixing holes to the appropriate depth in the marked location to suit the fixings, (if Latham have supplied red plastic plugs, the required diameter for the masonry drill bit is 5.5mm)
  3. Insert the red plastic plugs in the drilled holes in the floor finish ensuring the plug finishes level with the floor surface.
  4. Latham recommend that treads are installed using screws and Latham Titazel Thixotropic Epoxy Adhesive or Tytred 2 bedding compound. Both surfaces making contact with the adhesive (tread and underside of stair tread nosings) should be cleaned using a suitable solvent cleaner to ensure they are free of grease and foreign matter.
  5.  Assuming Adhesive is being used it is recommended that underside of the tread be abraded to create a better bond, this can be done with rough sand paper or similar.
  6. Apply the suitable adhesive to the underside of the stair tread nosings ensuring the adhesive is kept clear of the screws holes and back edge of the tread by 15mm, to reduce the likelihood of the adhesive squeezing out when the tread is mechanically fixed (more information about this and clean-up of adhesive can be found on the Latham Titazel Thixotropic Epoxy Adhesive or Tytred 2 Bedding Compound label).
  7. Carefully locate the tread back in position lining up the holes in the treads with the plugs.
  8. Insert and tighten the screws working alternatively from either end of the tread. The screws should be checked and re-tightened if required prior to finishing the entire installation.


Latham Australia does not recommend the use of adhesive alone for the installation of stair tread nosings as the bond can not be guaranteed without mechanical fixings.

When using Latham Titazel Thixotropic 2 Part Epoxy Adhesive for fixing Asbraloy and Asbrabronz Stair Tread Nosings and Inserts to flat and level substrate, it may be possible to increase the distance between the screw fixing locations, the maximum span that should be considered in 1000mm.

Asbraloy and Absrabronz insert treads can be installed in virtually any hard floor finish, including stone, tile concrete, terrazzo and timber. When insert treads are being installed the set back from the edge of the tread, there has been no specific information on what this set back should be from the front edge of the tread, although industry practice has been to set the inserts back 25-30mm.

Recently the updated Australian Standard AS 1428.1-2009 indicates a maximum set back of 15mm for a 50mm-75mm strip of contrast colour. When installing these in ramps or footpaths it is recommended that they are installed at a maximum of 150mm centres to try ensure the pedestrians foot is in contact with the safety tread at all times.

A correctly formed groove for the tread insert being used should be formed or cut in the floor finish (it is a good idea to request a sample of the profile for cutting the grooves to ensure you get the correct size). The tread insert should finish flush with the surrounding floor finish and the silicon carbide inserts will protrude slightly above the tread offering the required pedestrian safety.

Latham recommends the use of Titazel Thixotropic Epoxy Adhesive for the installation of tread inserts or Latham Tytred 2 in conjunction with countersunk holes screws and plastic plugs where applicable.

S Series Recessed Treads and Inserts are designed to be installed into a preformed recess. This can be cut or cast in concrete, cut into timber treads or achieved when tile etc are being installed on top of a concrete or similar (when the Stair Tread* is being installed in-conjunction with carpet see reference to carpet and vinyl installations below).

It may be necessary to increase the height of the set down (particularly if the tread is being installed with tiles etc). It is a good idea to request a sample of the profile for cutting the recess to ensure the cut out is the correct size for installation.

Filling the recess should be achieved using Latham Titazel RA-1 Filling and Levelling Compound or similar suitable product. The recess should be filled and levelled to a suitable level for the selected stair tread profile (see product depth information in the relevant table for the selected product selected), an allowance also needs to be made for Latham Titazel Thixotropic Epoxy Adhesive or Tytred 2 Bedding Compound (1mm).

Once this has been done proceed Basic Stair Tread Installation Details. *Insert Treads are considered not suitable for carpet installation by Latham Australia, although there is not a problem with Stair Treads, see the information below.

ST Series Treads can be installed over concrete, tile, pavers, stone, timber and other solid surfaces. After ensuring the surface is of good finish and even (if not refer to information on repairing damaged or worn surfaces) proceed to Basic Stair Tread Installation Details. When the Stair Tread* is being installed in conjunction with carpet, see reference to carpet and vinyl installations below.

SB Series Treads are designed to be installed on concrete or timber applications as a surface mounted profile, where vinyl or direct stick carpet is being installed. The 3mm straight edge combined with the 2mm x 45º bevel ensures a smooth transition from the floor finish to tread.

If levelling or packing is required, see the details under S Series Treads and Inserts. Once this has been done, proceed to instructions in Basic Stair Tread Installation Details.

ST Series Treads can be installed over carpet providing the carpet is firm and the substrate is good and a secure fixing can be made. Obviouslywhen a tread is being installed over carpet, adhesive can not be used. The following installation methods should be followed, although it is advisable to use a carpet punch to punch a hole through the carpet in the location where the hole is to be drilled, this will helpto ensure that the carpet is not pulled by the spinning drill. To carry out this installation it may be necessary to shave the carpet pile or to install continuous solid packers under the back edge of the tread. This style of installation generally can not be used on treads where carpethas underlay.


S Series Treads are designed to be installed into a preformed recess or on a packer in a carpet and underlay application, please see the attached detail; the timber packer should be securely fixed to the substrate.

Light Duty LDT, LDAS, Light Duty Resilient and Inox Series Stair Treads should be installed in a similar fashion to the details listed for the other treads. All profiles will be supplied without the inserts installed to facilitate mechanical fixing, the inserts are then applied later on site.

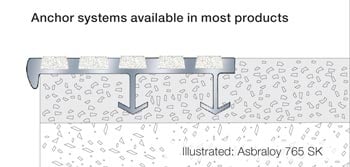
Cast-in fixing for tile, slate, exposed aggregate, concrete, etc. Asbraloy anchors provide ready fixing, eliminating wasted effort in drilling holes in fresh concrete. The cast in treads are easily worked into topping at the time the step is being formed. Care must be taken to prevent cement soiling safety tread surface. On request Cast-In Profiles can be supplied with a Zinc Chromate protective coating to the underside (specify ZCPC).

When specified at time of order SK and WAK Series treads & inserts can be supplied with the visual surface masked with Asbra Tape, this helps ensure the treads remain in pristine condition until the tape is removed. Tape should be removed as soon as practical after the concrete has set. Tape left in place for prolonged periods or subject to foot traffic may be difficult to remove from treads. Specify ‘Asbra Tape’ with order.


When installing 493SK, this is set back from the edge of the tread, there is no specific requirement for this set back, but industry practice has been to set the inserts back 25-30mm from the edge of the tread. Recently, the updated AS 1428.1-2009 indicates a maximum set back of 15mm for a 50/75mm strip of contrast colour. When installing these in ramps or foot paths, it is recommended that they are installed at a maximum of 150mm centres to try ensure the pedestrians foot is in contact with the safety tread at all times. The tread is inserted into a wet topping and worked in to the required depth. The aluminium section of the insert should finish level with the topping. If the topping is a sand cement bed and the floor finish is stone or tile, the tread should protruded by the thickness of the floor finish. Latham recommend the use of Asbra Fabric Tape on the top of each stair tread nosings, this helps ensure the tread remains in pristine condition until the tape is removed. If the tape gets locked in position by the poured topping use a razor blade to cut it free.  

When specified with order, Latham treads can be supplied with stainless steel countersunk metal thread screws and nuts at an additional charge. When the treads are being installed over open mesh galvanized steel treads, galvanized universal saddle clips, metal thread screws and nuts can be supplied at additional charge. Consideration when ordering needs to be given in relation to hole fixings in the treads and to the mesh spacing’s to ensure screw can be installed.

It may be necessary to increase the height of the set down (particularly if the tread is being installed with tiles etc) or you may be required to repair damaged or worn tread. This should be achieved using Latham Titazel RA-1 2 Part Filling and Levelling Compound or similar suitable product. The recess should be filled and levelled to a suitable level for the selected stair tread profile (see product depth information in the relevant table for the selected product selected). An allowance also needs to be made for Latham Titazel Thixotropic Epoxy Adhesive or Tytred 2 Bedding Compound (1mm). Once this has been done proceed to Point 1 in Basic Stair Tread Installation Details.

The treads are installed as detailed above. See Tredlite LED Decorative Nosing for further details on the LED Lighting and contact Latham Australia for further connection and installation detail.

Mall Bars are designed to be installed/cast in toconcrete topping. When insert treads are being installed there had been no specific requirement on what this set back from the edge of the tread should be, although industry practice has been to set the inserts back 25-30mm. Recently the updated AS 1428.1-2009 indicates a maximum set back of 15mm for a 50/75mm strip of contrast colour. When installing these in ramps or footpaths it is recommended that they are installed at a maximum of 150mm centres to try ensure the pedestrians foot is in contact with the safety tread at all times. The Mall Bars are often installed in rows of 2 or 3 particularly in stairs, once again there is no specific requirement for the spacing although in general the industry has been installing these at 20-30mm centres for many years.

The Mall bar is worked into the topping, which is best trowel cut whilst wet to assist with working the mall bar in to the surface, which is done by gently rocking the Mall Bar back and forth and carefully tapping it into position. The Mall Bar should be installed and protrude the surrounding floor finish by approximately 2mm.


Asbra Titazel ST-1 Trowelable Resin Safety Tread Kits can be installed in virtually any hard floor finish, including stone, tile concrete and timber. When ST trowelled bars are being installed, there has been no specific information on what this set back from the edge of the tread should be, although industry practice has been to set the inserts back 25-30mm. Recently the updated AS 1428.1-2009 indicates a maximum set back of 15mm for a 50/75mm strip of contrast colour.

When installing these in ramps or footpaths it is recommended that they are installed at a maximum of 150mm centres to try ensure the pedestrians foot is in contact with the safety treadat all times. The Mall Bars are often installed in rows of 2 or 3 particularly in stairs, once again there has been no specific requirement for the spacing although in general the industry has been installing these at 20-30mm centres for many years. Recently the updated AS 1428.1-2009 indicates a maximum set back of 15mm for a 50/75mm strip of contrast colour. A correctly cut or formed groove for the ST-1 trowelable inserts should be formed or cut in the floor/tread finish, the minimum recommended width for these is 12mm and the minimum recommended depth is 10mm. The kit should be mixed as described in the instructions on the tin. Latham HD-33 Heavy Duty Masking Tape should be installed on each side of the groove (2-3 layers), this ensures the finish protrudes above the floor/step finish a suitable amount (2-3mm) and also helps ensures the area remains clean. The ST-1 Trowelable insert is trowelled into the groove and once installed and trowelled level, a small amount of the clean-up solution supplied can be lightly wiped over the surface, before removing the HD-33 Heavy Duty Masking Tape prior to the ST-1 curing.

ST-1 can also be applied as a surface coating this is simply trowelled on to the required surface. The material is not designed to the trowelled in small strips as large surface area is required to ensure a proper bond when ST-1 is being used for surfacing.

Have a question about your upcoming project or requirements?

form-bg.jpg